Installing LAMP on Manjaro
This guide summarizes the steps to configure a LAMP server on Manjaro. It is intended for people who want to set up a dedicated web development space on their personal computer. If you are not using Manjaro or if you are using it on a production server, this guide is probably not suitable for your needs.
Preamble
A few years ago, when I wanted to install LAMP on my distribution, I started by looking for tutorials and wikis. I wanted to make sure I didn’t forget a step and, more importantly, since my server knowledge was still limited, I preferred not to make any mistakes.
The Arch Linux wiki is probably the most comprehensive, but the information is - or at least was - a bit scattered for what I was looking to do. So I decided to gather this information and make a guide that fits my needs. Since then, I’ve been updating it whenever I need to reinstall LAMP.
What is LAMP?
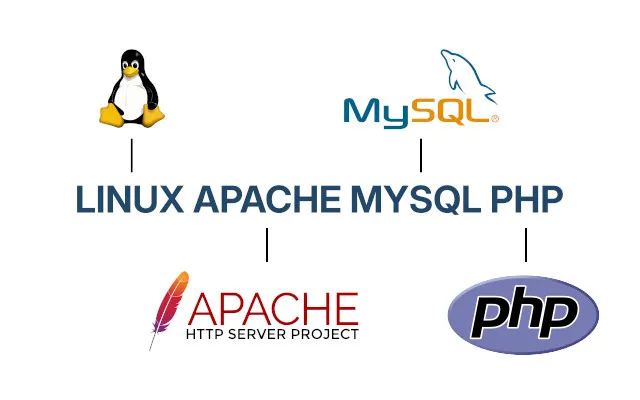
LAMP is an acronym for “Linux Apache MySQL PHP”. It is a set of software that allows you to set up a web server.
- Linux refers to the operating system
- Apache is the HTTP server
- MySQL is a database server
- PHP is a programming language
There are different variations to setting up a web server. Here are some examples:
- Linux can be replaced by Windows (WAMP) or Mac (MAMP)
- Apache can be replaced by Nginx (LEMP)
- MySQL can be replaced by MariaDB or PostgreSQL
- PHP can be replaced by Python or Perl
Our goal
In this guide we will install a working LAMP server with some additional features:
- we will install and configure PHPMyAdmin to manage databases,
- we will enable HTTPS to have an environment similar to the one used in production,
- we will set up a working folder in our “home”,
- we will disable the public folder of our “home”,
- we will see how to create virtual hosts for our sites.
Finally, we will be able to access our site in a browser by typing https://www.project.test/ where project is the name of the site. Our project files will be located in a folder in our “home” (here it will be /home/yourName/yourWorkFolder) and a symbolic link in /srv/http will allow Apache to access them.
Before starting
Prerequisites
- Using Manjaro: I have not tested but, logically, Arch Linux and its derivatives should also be compatible with this guide.
- Support ACLs: Some parts of the guide use Access Control Lists to manage access rights.
If you are using a distribution that is not based on Arch Linux, the steps described in this guide will not be suitable for your needs. You can take inspiration from it but make sure you understand what is written and what you are doing.
Advices
- Remember to adapt the commands if necessary: for example, in the commands, I use the
nanotext editor because it is easy to use; you may be using another editor. - Remember to replace dummy values: Some commands and configuration files use dummy values (e.g.
yourWorkFolderorproject.test), these values should be replaced with your own data. - Understanding diff notation: To avoid creating two nearly identical blocks of code, I use diff notation to indicate which lines to delete and which to add.
- Do not rely on line numbers: these numbers are given as an indication so that you can more easily find the right section, but they may be different for you depending on the version installed, your previous changes or if you have skipped certain steps in this guide. The diff notation can also be problematic since I only use CSS to define the line numbers (if multiple lines are deleted, the line numbers that follow are no longer reliable).
Step 1: Install LAMP
Installing packages
On Manjaro, we will install MariaDB as the SQL database server; it is a derivative of MySQL.
To begin, we install the necessary packages with pacman:
sudo pacman -S apache mariadb php php-apacheWhen the guide was written, the packages were at the following versions:
-
apache-2.4.62-1 -
mariadb-11.4.2-1 -
php-8.3.10-1 -
php-apache-8.3.10-1
If any parts of the guide seem different from what you have in front of you, it is probably due to using another version.
Configuring MariaDB
We start by initializing the tables:
sudo mariadb-install-db --user=mysql --basedir=/usr --datadir=/var/lib/mysqlNext, we start the MariaDB service with the following command:
sudo systemctl start mysqldFinally, we will secure the installation with a pre-installed script:
sudo mariadb-secure-installationThis script will ask us several questions to help us. I have included the answers to give as a comment below each question:
NOTE: RUNNING ALL PARTS OF THIS SCRIPT IS RECOMMENDED FOR ALL MariaDB
      SERVERS IN PRODUCTION USE!  PLEASE READ EACH STEP CAREFULLY!

In order to log into MariaDB to secure it, we'll need the current
password for the root user. If you've just installed MariaDB, and
haven't set the root password yet, you should just press enter here.

Enter current password for root (enter for none):
# No password, you have to press the Enter key.
[...]
Switch to unix_socket authentication [Y/n]
# We answer "N", we will use a password instead.
[...]
Change the root password? [Y/n]
# We answer "Y", we will be able to define the password for root.
[...]
Remove anonymous users? [Y/n]
# We answer "Y", we delete anonymous users.
[...]
Disallow root login remotely? [Y/n]
# We answer “Y”, for a more secure installation.
[...]
Remove test database and access to it? [Y/n]
# We answer "Y", the test database is not useful to us.
[...]
Reload privilege tables now? [Y/n]
# We answer "Y", we need to reload the tables.
[...]

Cleaning up...

All done!  If you've completed all of the above steps, your MariaDB
installation should now be secure.

Thanks for using MariaDB!
MariaDB is now configured. It is possible to connect as root, create a new user or a new database. Since we will use PHPMyAdmin (see step 2), we stop there for MariaDB.
PHP Configuration
Now we need to configure PHP to support MariaDB. Let’s edit its configuration file:
sudo nano /etc/php/php.iniWe need to uncomment the two MySQL related extensions:
;extension=mysqli
extension=mysqli
;extension=odbc
;zend_extension=opcache
;extension=pdo_dblib
;extension=pdo_mysql
extension=pdo_mysql
You can save and close the file.
Apache Configuration
Now we can configure Apache:
sudo nano /etc/httpd/conf/httpd.confThe Arch Linux wiki tells us that a library contained in the php-apache package generates an error with mod_mpm_event.so. The Apache documentation explains that mod_mpm_prefork.so provides greater stability and compatibility with older software compared to mod_mpm_event.so.
Let’s start by swapping these two modules:
LoadModule mpm_event_module modules/mod_mpm_event.so
#LoadModule mpm_event_module modules/mod_mpm_event.so
#LoadModule mpm_prefork_module modules/mod_mpm_prefork.so
LoadModule mpm_prefork_module modules/mod_mpm_prefork.so
Next, to handle redirects via htaccess, we need to enable another module:
#LoadModule rewrite_module modules/mod_rewrite.so
LoadModule rewrite_module modules/mod_rewrite.so
Then, we will specify the server name and the port to use:
#ServerName www.example.com:80
ServerName localhost:80
Finally, we need to enable PHP. To do this, we start by loading the PHP module:
LoadModule rewrite_module modules/mod_rewrite.so
LoadModule php_module modules/libphp.so

<IfModule unixd_module>
Then, at the end of the file, we add:
# Load PHP
<IfModule php_module>
    AddHandler php-script .php
    Include conf/extra/php_module.conf
</IfModule>
You can now save and close this file. You can start the Apache server with the following command:
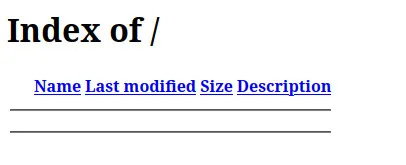
sudo systemctl start httpdThe LAMP server is now up and running. If you navigate to http://localhost in a browser, you should see a page similar to the one below:
However, we still have a few steps to reach our goal.
Step 2: Install and configure PHPMyAdmin
Let’s start by installing the package:
sudo pacman -S phpmyadminWhen the guide was written, the version used was: phpmyadmin-5.2.1-1.
Next, let’s create an Apache configuration file dedicated to PHPMyAdmin:
sudo nano /etc/httpd/conf/extra/httpd-phpmyadmin.confIn this file we will insert the following instructions to tell Apache where the PHPMyAdmin files are located:
# PHPMyAdmin
Alias /phpmyadmin "/usr/share/webapps/phpMyAdmin"
<Directory "/usr/share/webapps/phpMyAdmin">
    DirectoryIndex index.html index.php
    AllowOverride All
    Options FollowSymlinks
    Require all granted
</Directory>
You can save and close this file. Now you need to edit the Apache configuration to include the PHPMyAdmin configuration:
sudo nano /etc/httpd/conf/httpd.confAt the end of the file we add:
# PHPMyAdmin configuration
Include conf/extra/httpd-phpmyadmin.conf
You can save and close this file. Now we need to configure PHPMyAdmin itself. In order to authenticate using cookies, we need to provide a key for blowfish_secret.
To generate this passphrase you can use openssl for example:
openssl rand -base64 22Note the output of the command and let’s continue by editing the PHPMyAdmin configuration file:
sudo nano /usr/share/webapps/phpMyAdmin/config.inc.phpWe will use our passphrase in the next section:
/**
 * This is needed for cookie based authentication to encrypt the cookie.
 * Needs to be a 32-bytes long string of random bytes. See FAQ 2.10.
 */
$cfg['blowfish_secret'] = ''; /* YOU MUST FILL IN THIS FOR COOKIE AUTH! */
$cfg['blowfish_secret'] = 'your-passphrase'; /* YOU MUST FILL IN THIS FOR COOKIE AUTH! */
Now we need to define a temporary folder for PHPMyAdmin:
/**
 * You can find more configuration options in the documentation
 * in the doc/ folder or at <https://docs.phpmyadmin.net/>.
 */

$cfg['TempDir'] = '/tmp/phpmyadmin';
You can save and close this file. Since we previously modified the Apache configuration, we need to restart the service:
sudo systemctl restart httpdPHPMyAdmin is now available at the URL http://localhost/phpmyadmin. In your browser, you should see the following page:
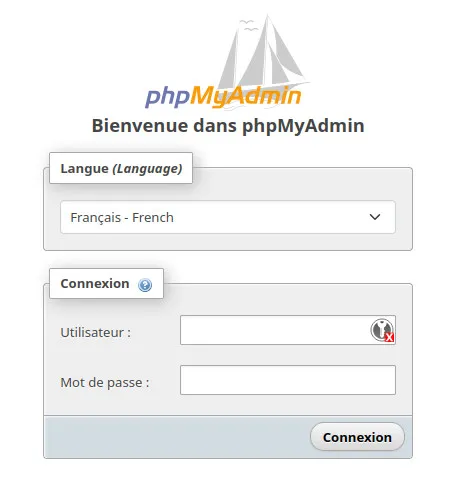
To log in as “root”, you must reuse the password defined during MariaDB configuration. All you have to do is configure the users and databases according to your needs.
If you went too fast or decided not to set a password for the “root” user, you cannot log in. You must follow the following steps to add or change the password.
First you need to connect to the MySQL server:
sudo mysql -u root -pNext, we set a password for the “root” user:
ALTER USER 'root'@'localhost' IDENTIFIED VIA mysql_native_password USING PASSWORD("your-password");Then we disconnect from the MySQL server:
exitFinally, all that remains is to restart the mysqld service:
sudo systemctl restart mysqldStep 3: Create a dedicated workspace
Remember, we want Apache to read files in /srv/http. The problem for us is that this path requires administrator rights to create or modify files. The easiest way to get around this is to create a workspace in our “home” directory.
Create a working folder in your “home”
Let’s start by creating a folder that will contain our different projects:
mkdir /home/yourName/yourWorkFolderIn order for Apache to access this folder, we need to add read and execute permissions to our “home” folder for the “http” user. We will use the ACLs:
sudo setfacl -m "u:http:r-x" /home/yourNameThen, we repeat the operation on our working directory to give Apache all rights, recursively:
sudo setfacl -R -m "u:http:rwx" /home/yourName/yourWorkFolderWe repeat the same operation as above but with an additional option to set these rights as the default for any new file or folder:
sudo setfacl -d -R -m "u:http:rwx" /home/yourName/yourWorkFolderYou can check the new permissions with:
getfacl -p /home/yourName/yourWorkFolderThe command should produce the following output:
# file: /home/yourName/yourWorkFolder
# owner: yourName
# group: yourName
user::rwx
user:http:rwx
group::r-x
mask::rwx
other::r-x
default:user::rwx
default:user:http:rwx
default:group::r-x
default:mask::rwx
default:other::r-x
Update the root folder of localhost
Let’s start by creating the folder that will serve as the root of localhost:
mkdir ~/yourWorkFolder/localhostWe also need a subfolder to contain the files accessible from the browser (here I name it htdocs but you can use another name like www):
mkdir ~/yourWorkFolder/localhost/htdocsNext, let’s create a symbolic link from our localhost folder to /srv/http/default:
sudo ln -s /srv/http/defaultNext, let’s edit the Apache configuration file:
sudo nano /etc/httpd/conf/httpd.confWe need to replace the default configuration with the path to our new root:
#
# DocumentRoot: The directory out of which you will serve your
# documents. By default, all requests are taken from this directory, but
# symbolic links and aliases may be used to point to other locations.
#
DocumentRoot "/srv/http"
DocumentRoot "/srv/http/default/htdocs"
<Directory "/srv/http">
<Directory "/srv/http/default/htdocs">
You can save and close this file.
You can verify that Apache has access to your htdocs folder with the following command:
getfacl -p /home/yourName/yourWorkFolder/localhost/htdocsThe command should produce the following output:
# file: /home/yourName/yourWorkFolder/localhost/htdocs
# owner: yourName
# group: yourName
user::rwx
user:http:rwx
group::r-x
mask::rwx
other::r-x
default:user::rwx
default:user:http:rwx
default:group::r-x
default:mask::rwx
default:other::r-x
If not, you probably forgot the last command (the one adding the default rights) in the previous step.
Disable Public Folder
By default, Apache is configured to allow access to the $HOME/public_html directory from the URL http://localhost/~user/. Since we have a dedicated workspace, we don’t need this public folder; let’s disable it.
sudo nano /etc/httpd/conf/httpd.confTo disable this folder, we make the following change:
# User home directories
Include conf/extra/httpd-userdir.conf
#Include conf/extra/httpd-userdir.conf
You can save and close this file.
Step 4: Configure SSL
Install and prepare mkcert
To use SSL, we need valid certificates so that we are not blocked by the browser. We will use mkcert. This is a tool to create locally trusted certificates.
sudo pacman -S mkcertWhen writing the guide, the version used was: mkcert-1.4.4-2.
Once the package is installed, you need to install the root certificate (rootCA) using the following command:
mkcert -installYou should see the following output:
Created a new local CA 💥
The local CA is now installed in the system trust store! ⚡️
The local CA is now installed in the Firefox and/or Chrome/Chromium trust store (requires browser restart)! 🦊
You can check the installation folder with the following command:
mkcert -CAROOTCreate a certificate for localhost
We will create a folder containing the certificate and its key for localhost:
mkdir ~/yourWorkFolder/localhost/certsThen we create a certificate for localhost (and 127.0.0.1). Either you move into the folder and use mkcert without options:
cd ~/yourWorkFolder/localhost/certs
mkcert localhost 127.0.0.1
Or, you use the following command to avoid moving:
mkcert -key-file ~/yourWorkFolder/localhost/certs/localhost+1-key.pem -cert-file ~/yourWorkFolder/localhost/certs/localhost+1.pem localhost 127.0.0.1The command should return the following information:
Created a new certificate valid for the following names 📜
 - "localhost"
 - "127.0.0.1"

The certificate is at "/home/yourName/yourWorkFolder/localhost/certs/localhost+1.pem" and the key at "/home/yourName/yourWorkFolder/localhost/certs/localhost+1-key.pem" ✅

It will expire on 13 November 2026 🗓
Enable SSL
We start by editing the SSL configuration file:
sudo nano /etc/httpd/conf/extra/httpd-ssl.confIn this file we will replace the server name and localhost root:
#   General setup for the virtual host
DocumentRoot "/srv/http"
DocumentRoot "/srv/http/default/htdocs"
ServerName www.example.com:443
ServerName localhost:443
ServerAdmin you@example.com
If you have a working mail server, you can also change the email address.
Next we’ll add the previously generated certificate to localhost. Remember, we created a symbolic link so we don’t need to use a path to our “home”:
SSLCertificateFile "/etc/httpd/conf/server.crt"
#SSLCertificateFile "/etc/httpd/conf/server.crt"
#SSLCertificateFile "/etc/httpd/conf/server-dsa.crt"
#SSLCertificateFile "/etc/httpd/conf/server-ecc.crt"
SSLCertificateFile "/srv/http/default/certs/localhost+1.pem"
Then we also change the path to the private key:
SSLCertificateKeyFile "/etc/httpd/conf/server.key"
#SSLCertificateKeyFile "/etc/httpd/conf/server.key"
#SSLCertificateKeyFile "/etc/httpd/conf/server-dsa.key"
#SSLCertificateKeyFile "/etc/httpd/conf/server-ecc.key"
SSLCertificateKeyFile "/srv/http/default/certs/localhost+1-key.pem"
You can save and close the file. Now we also have some changes to make to the Apache configuration file:
sudo nano /etc/httpd/conf/httpd.confWe enable the module providing a shared object cache needed for some directives like SSLSessionCache:
#LoadModule cache_socache_module modules/mod_cache_socache.so
#LoadModule socache_shmcb_module modules/mod_socache_shmcb.so
LoadModule socache_shmcb_module modules/mod_socache_shmcb.so
#LoadModule socache_dbm_module modules/mod_socache_dbm.so
Then we enable the SSL module itself:
#LoadModule slotmem_plain_module modules/mod_slotmem_plain.so
#LoadModule ssl_module modules/mod_ssl.so
LoadModule ssl_module modules/mod_ssl.so
#LoadModule dialup_module modules/mod_dialup.so
Finally, we need to specify the path to the SSL configuration file:
# Secure (SSL/TLS) connections
#Include conf/extra/httpd-ssl.conf
Include conf/extra/httpd-ssl.conf
#
You can save and close this file. We have completed the SSL configuration.
We will restart the server to check the configuration:
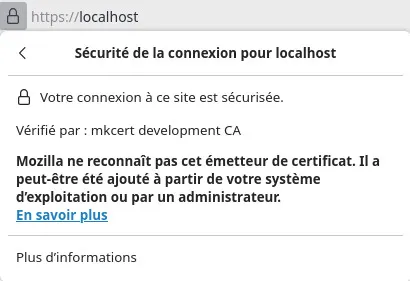
sudo systemctl restart httpdIf you try to access the address https://localhost/ (note the https) from your browser, you should get the same page as before.
You can click on the padlock next to the URL to verify that the certificate is indeed provided by mkcert.
Step 5: Use Virtual Hosts
Creating a new virtual host
For this example of creating a virtual host, we will use the domain name project.test. It will be accessible in HTTPS with or without www.. Remember to adapt the following steps according to your needs.
We need to use a reserved top-level domain (or TLD). Here I choose .test because it’s the shortest and I think it fits well with what we’re doing.
Let’s start by creating a dedicated folder in our workspace created in step 3. We will also need to create three folders:
-
htdocs(or use whatever name you like), which will serve as the root for files accessible from the browser, -
logsto store logs specific to this domain, -
certsto store the certificate and its key specific to this domain.
mkdir -p /home/yourName/yourWorkFolder/project.test/htdocsThe -p option of mkdir allows to create the parent folders if they do not exist. Here, project.test will be created at the same time as htdocs.
Next, we create the logs subfolder:
mkdir /home/yourName/yourWorkFolder/project.test/logsThen, the certs subfolder:
mkdir /home/yourName/yourWorkFolder/project.test/certsIf your shell supports it, you can combine these three commands into one:
mkdir -p /home/yourName/yourWorkFolder/project.test/{htdocs,logs,certs}Now let’s generate a valid certificate for our domain name:
mkcert -cert-file ~/yourWorkFolder/project.test/certs/project.test.pem -key-file ~/yourWorkFolder/project.test/certs/project.test-key.pem project.test "*.project.test"In our virtual host configuration file, we don’t want to use the path to our “home” but /srv/http. So we create a symbolic link:
sudo ln -s /home/yourName/yourWorkFolder/project.test /srv/httpNext, we will create a folder to store the configurations of our different virtual hosts:
sudo mkdir /etc/httpd/conf/vhostsThen we create a configuration file for our domain name:
sudo nano /etc/httpd/conf/vhosts/project.testIn this file we will add the following lines:
<VirtualHost *:80>
    ServerAdmin webmaster@project.test
    DocumentRoot "/srv/http/project.test/htdocs/"
    ServerName www.project.test
    ServerAlias *.project.test
    ErrorLog "/srv/http/project.test/logs/error.log"
    CustomLog "/srv/http/project.test/logs/access.log" combined
    <Directory /srv/http/project.test/htdocs/>
        Options -Indexes +FollowSymLinks +MultiViews
        AllowOverride All
        Require all granted
    </Directory>
</VirtualHost>

<VirtualHost *:443>
    ServerAdmin webmaster@project.test
    DocumentRoot "/srv/http/project.test/htdocs/"
    ServerName www.project.test:443
    ServerAlias *.project.test:443
    SSLEngine on
    SSLCertificateFile "/srv/http/project.test/certs/project.test.pem"
    SSLCertificateKeyFile "/srv/http/project.test/certs/project.test-key.pem"
    ErrorLog "/srv/http/project.test/logs/error.log"
    CustomLog "/srv/http/project.test/logs/access.log" combined
    <Directory /srv/http/project.test/htdocs/>
        Options -Indexes +FollowSymLinks +MultiViews
        AllowOverride All
        Require all granted
    </Directory>
</VirtualHost>
You can save and close this file. We then edit the Apache configuration file so that it loads our virtual host configuration:
sudo nano /etc/httpd/conf/httpd.confIn this file we will add the following lines:
# Virtual hosts
#Include conf/extra/httpd-vhosts.conf
Include conf/vhosts/project.test
Remember to save and close this file, then let’s modify the hosts file so that our domain name is recognized:
sudo nano /etc/hostsFinally, in this file we add:
# This host address
127.0.1.1  computer-name
# Virtual hosts
127.0.0.1  project.test
127.0.0.1  www.project.test
You can save and close the file. We have completed the configuration of our LAMP server but a test is needed to verify that it is working properly.
Testing our virtual host
First of all, it is necessary to restart the server to be sure that our previous modifications are correctly applied:
sudo systemctl restart httpdYou should now have access to project.test or www.project.test in your browser. To test that it works properly, let’s create a PHP file:
nano ~/yourWorkFolder/project.test/htdocs/index.phpThen, in this file, let’s add:
<?php
phpinfo();
You can now save and close this file. Now, by going to https://www.project.test, you should get a page containing the output of phpinfo and starting with “PHP Version”.

If everything went well, you can delete the previously created file; it is no longer useful.
rm ~/yourWorkFolder/project.test/htdocs/index.phpThat’s it, you have a functional LAMP server and a dedicated workspace in your “home” which does not require administrator rights. Before you go, remember a few useful commands to use your development server.
What you need to remember
To manage the server
To start Apache and MySQL, you will use the following commands:
sudo systemctl start httpd
sudo systemctl start mysqld
You can also decide to automatically start Apache and MySQL at system startup. To do this, use:
sudo systemctl enable httpd
sudo systemctl enable mysqld
If you make any changes to the Apache configuration, you will need to restart the service:
sudo systemctl restart httpdFinally, if you want to stop Apache and MySQL, you will need to use the following commands:
sudo systemctl stop httpd
sudo systemctl stop mysqld
To manage your virtual servers
- You need to create a folder in your workspace dedicated to your project (and subfolders to separate public files from logs),
- You need to create a symbolic link in
/srv/httppointing to the created folder, - You need to generate a new certificate, using
mkcert, for your new domain name, - You need to add a configuration file for your virtual server in the Apache folder,
- You need to edit the
/etc/hostsfile to be able to access the domain name from your browser, - You must restart Apache for the changes to take effect.